DIY Roof Mounting Systems Are Possible.
The picture above is a 7.1 kW roof mounted system using homemade racking made of fibreglass pultrusions. From the ground level this looks similar to any other roof mounted solar panel installation.
Wood systems are possible as well, but usually these would only be considered for barns or outbuildings, as they don't appear as polished in appearance.
Fibreglass Channel Roof Mount Racking
For the installation pictured above, the heart of the system are pultrusions channels that were bought for a pittance from a window supplier that no longer needed them, and the homeowner (an Engineer and a friend) innovative designed a way to use them as a roof mount racking system. The cost of the channel material was insignificant. He bought all that the supplier had on hand, and used it to do three roof faces with the same system. An important characteristic is that the fibreglass rails are a reasonably close match to the wood in its coefficient of expansion. A pultrusion is similar in concept to aluminium products that are extruded through a die to determine their shape.
The fibreglass pultrusions provide the E - W rails, two per panel and the panels are attached by the built in mounting holes and some locally made brackets which cost less than $100. Thus in the solar industry they are bolted to the bottom on the panel, but fastened in place from above. The aluminium brackets provide both a means of permitting expansion and contraction of the panels to occur with low stress, and also provide the grounding bonding between adjacent panels. They also provide for a top mounting, where the panel is preassembled with four brackets on the ground, and then on the roof the panel assembly is lowered onto four studs and then a self-locking nut + washers is attached from above.
I have CAD drawings of the aluminium brackets used in this application. The brackets provides support to two adjacent panels, from the one stud that you can see in the picture below.
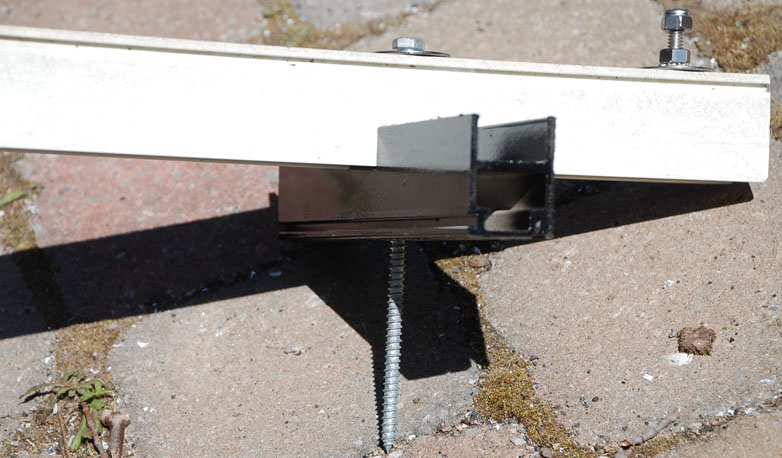
The white rail is the long E - W rail, and the black one is a spacer to keep the rail of the roof, so that the rain drainage is not impeded by the rail. This attaches to the roof by the lag bolt, very similar to the L feet used by most rail systems. The stud sticking up is used to anchor the panel to the rail, two panels are attached to one stud. The two rails are egg crated together so that they fit together.
I was present and helped in a minor way on the day that these were installed, and took a lot of photographs. This is the only home made mount that I have seen that was not made of wood or metal.
From the ground you would not be able to tell that this was done with fibreglass rails, except for the colour this looks very similar to an aluminium extruded rail mounting system.
This installation is located near Arnprior, and a guided tour of this installation might be possible to arrange, at the owner's convenience.
This installation was done by a crew of contractors who had never installed any solar system before, and under the owner's direction it took one day to mount the rails onto the roof, and by mid afternoon on the 2nd day when this picture was taken the last panel had been attached and wired up. This installation uses a string inverter inside the garage. (The roof is not facing due south. The tree in the picture has subsequently been trimmed to remove its shading.)
The key to using this method is finding the channel at a good price. Buying this new directly from the manufacturer offers no saving over the extruded aluminium rails that are made specifically for this purpose. Tour your local scrap yards, and look for a similar type of product that you can adapt for this purpose.
Corrugated Barn and Shed Roofs
For the DIY person, there is nothing as easy to work with than wood. Usually all the tools required are already in your possession, or can be borrowed from your brother in law. No heavy equipment is required.

When the appearance is not critical, and the installation is not on a residence's roof, then pressure treated 2x4 can be used as a basis of creating a mounting to fit on a corrugated roof. 2x4s are run in a N - S direction and lag bolted to the buildings rafters or trusses. Care must be taken not to crush the corrugated metal roofing by over tightening the lag bolts. The sealing system is usually some roofer's ashphalt sealant. The 2x4 must span at least two corrugations in order to lie flat.
Then a series of horizontal (E - W) 2x4 are run the width of the installation and mounted on top of the N - S lengths of PT wood.
The reason for wood in two directions is to provide proper drainage. If a E - W 2x4 was mounted directly on top of the corrugation, this would tend to block rain and snow sliding off the roof.
The horizontal 2x4 are predrilled and stainless steel bolt, washers and nuts are inserted, to create a stud facing upward on which to attach the panels, using the same type of bracket used for the fibreglass rails. The benefits of using the brackets are the same. In this case bottom access for tightening fasteners would be very difficult, and the brackets provide a top fastening system for convenient installation. We can supply CAD diagrams to enable fabrication of the brackets, and an assembly drawing of how this goes together. The assembly order is important, as no aluminium should touch ACQ treated pressure treated lumber. Please read the DIY ground mounted description of the bracket for more details.
It is not a great idea for the pressure treated lumber to contact the galvanized corrugated roofing either, as galvanic action could accelerate corrosion. To prevent this a layer of insulating material such as ice and roof shield is placed under the lower 2x4, insulating it from the galvanized surface and solving the concern. Butyl mastic tape can be used to help create a watertight seal where the lag bolt goes through the metal roofing. A stainless steel fender washer or spacer could also be used to prevent PT lumber from contacting the galvanized metal roof surface. Stainless Steel is the metal least affected by the ACQ preservative in today's preserved wood.
The N - S 2x4 could be replaced by a series of Hanger bolts, such as Unirac's part number 310025. This is a 3/8" stainless steel shaft with a lag screw thread on the bottom to penetrate the rafter, and machine threads to accept flange nuts on the top. This would be used to support the E - W 2x4 and it would not contact the corrugations, eliminating the concern about PT lumber interacting with the galvanized coating of the steel roof, and also removing the concern about crushing the corrugations. Since the PT 2x4 is higher off the roof, it improves water and snow flow off the roof. This hangar bolt is also a recommended way to install commercial aluminium rails such as SolarMount to the roof, together with an L foot.
An EPDM bonded washer over the shaft of the hanger makes a more positive water seal. (EPDM is the most popular sealing material for solar installations). The EPDM washer is pressed against the top of the corrugation by the lower flange nut, and if the hanger bolt is not inserted sufficiently, or the corrugation is too low, then a spacer would be slipped over the hanger bolt to ensure the lower flange nut presses the EDPM washer onto the corrugation. When the hanger bolt goes into the trough of the corrugation, then a spacer will certainly be required. This is assuming the Unirac's hanger bolt. Other product brand of hangar bolt may be fully threaded all the way to the lag bolt thread, in which case this would not need a spacer, but just an extra nut.
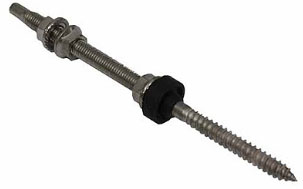
This is a hanger bolt made by Schletter. This has the desirable characteristics of having a machine thread for nearly all of its length, and an extra flange nut to force an EPDM washer against the top of the corrugation. They are available in 7.9 and 11.8 inch lengths.
You can improvise an EPDM washer by using a stainless steel fender washer, and cutting out a round or square portion of a sheet of EDPM material. You can use a leatherworker's style hollow punch cutter to cut out the hole size that you need. You can more conveniently buy stainless steel bonded EPDM sealing washers in bulk from Cook Fasteners in Mississauga.
The trickiest part of using lag bolts or hanger bolts on a corrugated roof is when the hole must go on the sloped side of the corrugation instead of the top or bottom. If the barn is built of beams or posts, this is not a problem, just shift the fastener's hole left or right a bit from the center of the beam. When the rafter is 2" wide, or less if 2x4 trusses are used, there is not enough width to shift the fastener. In this case blocking below the roofing's metal surface may be called for, or a bolt to anchor into the purlin.
Steel Barn and Shed Roofs
This section applies to more modern steel roofing products that are NOT corrugated. These are flat panels with periodic trapezoidal ridges.
This explanation will assume that E W 2x4s are used as the support to attach the panels. Then the panel fastening is similar to a wood based home made ground mounted racking system. With the use of the recommended mounting bracket, only one bolt is required to attach two adjacent panels. This is the same as the corrugated roof. Please read the DIY ground mounted description of the bracket for more details.
Most of the time, the rafter will be underneath a flat part of the steel roof. In this case a suitable spacer is required, so that a horizontal (E - W) pressure treated 2x4 does not contact the top of any of the trapezoids. A short length of imitation wood decking that is actually a type of plastic could serve as this spacer. This plastic is designed to be UV and water resistant, but a concern remains with its coefficient of expansion. This is used with a long enough stainless steel lag bolt top passed trough the 2x4, spacer, roof purlins or sheathing, and then have 3" of thread to anchor into the rafters.
When the rafter is under the trapezoid, then something different is required to do the attaching. Two spacers are required, either side of the trapezoid. That avoids crushing the trapezoid.
A Hanger bolt, such as mentioned above could be used. This would be used to support the E - W 2x4 and the wood would not contact the trapezoids, eliminating the concern about PT lumber interacting with the galvanized coating or the painted finish of the steel roof, and also removing the concern about crushing the trapezoids.